Tuesday, March 18, 2014

PLANE: Final Composition

For my final plane piece, I decided to use some of the original ideas I had with my studies. I liked the sequential relationship between my three studies, and I wanted to incorporate that into my final. However, I wanted to add some kind of extreme asymmetry to the overall composition, so I improvised a little. I kept modules of  the icosidodecahedron (pentagons and triangles) and the icosahedron (triangles). And since triangles were the common element, I decided to make a module of a 3-D triangle. I elongated the triangle to make a defining point, adding extreme contrast tho the other two modules.

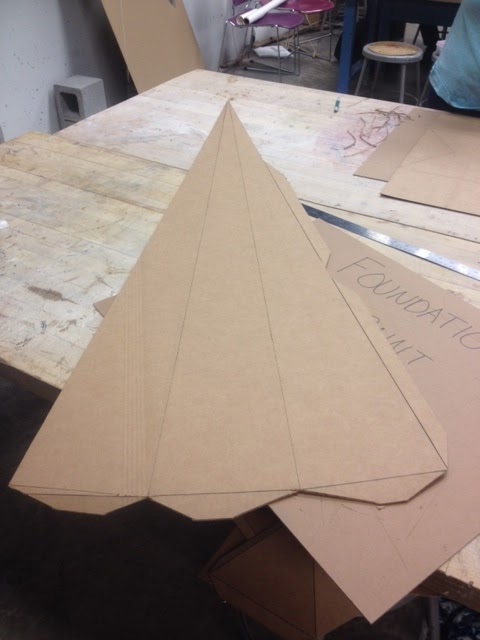
To build my first two modules, I made a pentagon and a triangle template with bristol paper. I measured out the appropriate angles and lengths I wanted for each facet of the shapes, so this way all I had to do was lay out the template on the cardboard and and trace (so I wouldn't have to measure out each chap every time. I based the size of the templates off of what I wanted my triangle facets to be, that way, the two modules would fit together perfectly with their common triangular facets.  With the longer triangular piece, I decided on a length and dimensions according to the triangular facets, and determined my angles necessary from there. 


Once I had my templates, I began to layout the modules of my modules on sheets of cardboard (I went through approximately two and a half sheets). I added some glue flaps for extra support in certain areas.  Once I had drawn out all of my separate pieces, I began to cut out the selected cardboard, using a box cutter and a corked-back metal ruler. Once al the separate pieces were cut out, I began to score the individual facets and glue flaps.  


Once all of the pieces to my modules were cut out, I began then to assemble them together using paper tape. I had never used paper tape before and let me tell you--I don't like it. It was extremely frustrating and messy, but it definitely held the cardboard together well. Assembling the modules together was a lot more difficult then I anticipated at first; I had to have a someone help me a couple of times to hold it together while I taped. After a while, it got slightly easier. After the modules were assembled, it was then time to assemble all three modules together into the final piece (also accomplished with paper tape).

After the final piece was assembled, all that was left then was to paint it. I wanted to emphasize the elongated point of the piece, but I didn't wanted it to feel segregated from the rest of the composition. To do this, I decided to create a uniting path flowing throughout connected facets of the piece going from the point to around the icosidodecahedron and the icosahedron. I chose red because red is bold and attentive. For the remaining facets, I wanted a more subtle, muted color, so I chose a light brown paint (you could say cardboard inspiration). I used interior semi-gloss house paint for both hues. 


I think I generally responded to the criteria guidelines, trying to explore different options, but also using inspiration from my original sketches and studies.I think that it is more visually interesting and appealing than my last piece, consciously going for an asymmetrical composition to primarily achieve this. I still think my craft is below par, but now that I've had some practice with paper tape and cardboard sculpture, I feel I could improve it for future execution.   Some of my angles were still slightly off which made assembly slightly more difficult and offset, but not so dramatically so as to be immediately noticed. Overall, I am pretty proud of this piece. 


Tuesday, February 18, 2014

PLANE: Studies

For my studies, I was interested in the 1st option: 3 forms representing alteration. With that in mind, I wanted to focus on the combination of shapes to make a unified form, each stage adding an additional shape to the facets of the overall volume.


I printed off guides for a icosahedron (all triangle facets), a rhombicuboctahedron (triangle and square facets), and a rombicosidodecaahedron (triangle, square, and pentagon facets).
Once i did that, I laid the sheets over top of bristol paper and imprinted all points of intersection within the shaped outlines. From there, I used a ruler to complete the outlines on the bristol, scored the lines, then folded my forms.


icosahedron


rhombicuboctahedron 


rombicosidodecaahedron 


Tuesday, February 4, 2014

LINE INTO FORM: Final Composition

Design Statement

I formulated my final composition using a combination of three of my studies:


I really loved the shape created by my paper study; how it was such a rippled, open shape without any of the original sheet taken out, just slits cut selectively. For my burlap and stirring straw studies, I was interested in the mimicking of forms through curvaceous vs. straight lines--I liked the harmony, as well as the contradiction of the two. So, I combined the linear opposition of the mixed media studies to the shape of my paper study. 

So, I first composed the the larger version of my paper study. To do this, I used a larger construction-like paper, cutting it into dimensions of 24" x 31". From there, I doubled the dimensions of my varying line widths and lengths, to allow for a greater number of finer lines.


From there, I used a corked-back yard stick to cut straight complete lines. Once I cut all of my necessary lines, I used shot glue gun to attach my points and lines, and lucky this paper held almost the same proportional tension in the paper as my study. After I manipulated my paper form in the shape I wanted it to be, I had to think go how I wanted to add the linear element.


I liked the boldness of the red that was present in the stirring straws and I wanted the linear aspects of the piece to extend beyond the dimensions of the curvaceousness of the paper. So I obtained a few square dowel rods, and painted them red. After they dried, I began to incorporate them into the piece, playing around with different positions until I came up with a model that sturdily acted in the form and allowed for it to stand freely while keeping its shape. I attached the rods together with hot glue as well. After it was able to stand on its own, I played around with the exposed lines of the paper, slightly straying away from the original study allowed by the larger dimensions. 


Overall, I was pretty pleased with my resulting form; I had fun with it. I do think my craft could have been a little better, that is something I can work on. I liked what this project turned into just by playing around with paper and lines, until finding unique interesting forms. I liked the idea of starting out with a linear concept, then turning it into a curvy form, then once again incorporating linear elements. 


Evaluation Criteria:


Did you respond to the project criteria in a thoughtful way that shows progression through your studies and design process?


I believe I did show some original thought in my initial studies, more so in the paper studies. I used a combination of my initial studies, taking elements from each that I really wanted to incorporate in to my final piece. I made my final piece larger, transitioning to a larger scale and using the materials necessary to accomplish this. 

Did you explore depth and a range of concepts?


I think I did in my studies, just playing around with different shapes and lines, mostly through trial in error, keeping the ones that I found interesting; and using both linear and form concepts. I probably could have showed a little more depth in my final, perhaps stepping away from my originals ideas and trying something different. However, I am pleased with my final form.

Is it original and visually attractive/interesting?


I hope so! I mean, I'm pretty proud of it, but an audience may no think so, or see something in it that I don't necessarily see. I really like the overall shape of it, and I think the fact that it is free standing strengthens the overall composition. I like the bold contrast of the red dowel rods and off-white paper.

Have you produced quality work with attention to craft and detail?


For the most part, I believe so. Like I said earlier, I think I could have handled my craft a little better, more so with the hot glue and dowel rods. I think my detail and craft is better more so in the paper aspect of the piece, making sure I cut my lines straight and even. And moving it around from place to place as I worked on it effected the structure of the paper a little bit. And I wish I had made it a little sturdier; that is something I struggled with while I  was positioning the dowel rods.


Tuesday, January 28, 2014

LINE INTO FORM : Studies

Sketches


Paper


Other Materials


LINE INTO FORM: Vocabulary

Modules

Dimensions of a structural component, used as a unit of    measurement or standard for determining the proportion of the rest of the construction.


Transformation/Progression

To change in composition or structure; to change the outward form or appearance of. Passing successfully from one member/stage of series to the next.


Unity

All of the components of a composition combine to make a balanced, harmonious, complete whole.